|
|
1. 下载dolphinscheduler
下载地址https://dolphinscheduler.apache.org/en-us/download/download.html
下载版本为:
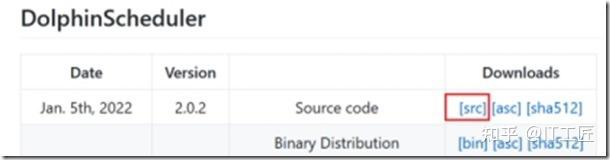
src源码,需要重新编译
查看pom.xml对应的组件版本,这里不介绍编译方式,下次用到介绍View Code
<curator.version>4.3.0</curator.version>
<zookeeper.version>3.4.14</zookeeper.version>
<spring.version>5.3.12</spring.version>
<spring.boot.version>2.5.6</spring.boot.version>
<java.version>1.8</java.version>
<logback.version>1.2.3</logback.version>
<hadoop.version>2.7.3</hadoop.version>
<quartz.version>2.3.0</quartz.version>
<jackson.version>2.10.5</jackson.version>
<mybatis-plus.version>3.2.0</mybatis-plus.version>
<mybatis.spring.version>2.0.1</mybatis.spring.version>
<cron.utils.version>9.1.3</cron.utils.version>
<druid.version>1.2.4</druid.version>
<h2.version>1.4.200</h2.version>
<commons.codec.version>1.11</commons.codec.version>
<commons.logging.version>1.1.1</commons.logging.version>
<httpclient.version>4.4.1</httpclient.version>
<httpcore.version>4.4.1</httpcore.version>
<junit.version>4.12</junit.version>
<mysql.connector.version>8.0.16</mysql.connector.version>
<slf4j.api.version>1.7.5</slf4j.api.version>
<slf4j.log4j12.version>1.7.5</slf4j.log4j12.version>
<commons.collections.version>3.2.2</commons.collections.version>
<commons.httpclient>3.0.1</commons.httpclient>
<commons.beanutils.version>1.9.4</commons.beanutils.version>
<commons.configuration.version>1.10</commons.configuration.version>
<commons.lang.version>2.6</commons.lang.version>
<commons.email.version>1.5</commons.email.version>
<poi.version>4.1.2</poi.version>
<javax.servlet.api.version>3.1.0</javax.servlet.api.version>
<commons.collections4.version>4.1</commons.collections4.version>
<guava.version>24.1-jre</guava.version>
<postgresql.version>42.2.5</postgresql.version>
<hive.jdbc.version>2.1.0</hive.jdbc.version>
<commons.io.version>2.4</commons.io.version>
<oshi.core.version>3.9.1</oshi.core.version>
<clickhouse.jdbc.version>0.1.52</clickhouse.jdbc.version>
<mssql.jdbc.version>6.1.0.jre8</mssql.jdbc.version>
<presto.jdbc.version>0.238.1</presto.jdbc.version>
<spotbugs.version>3.1.12</spotbugs.version>
<checkstyle.version>3.1.2</checkstyle.version>
<zookeeper.version>3.4.14</zookeeper.version>
<curator.test>2.12.0</curator.test>
<frontend-maven-plugin.version>1.6</frontend-maven-plugin.version>
<maven-compiler-plugin.version>3.3</maven-compiler-plugin.version>
<maven-assembly-plugin.version>3.1.0</maven-assembly-plugin.version>
<maven-release-plugin.version>2.5.3</maven-release-plugin.version>
<maven-javadoc-plugin.version>2.10.3</maven-javadoc-plugin.version>
<maven-source-plugin.version>2.4</maven-source-plugin.version>
<maven-surefire-plugin.version>2.22.1</maven-surefire-plugin.version>
<maven-dependency-plugin.version>3.1.1</maven-dependency-plugin.version>
<rpm-maven-plugion.version>2.2.0</rpm-maven-plugion.version>
<jacoco.version>0.8.4</jacoco.version>
<jcip.version>1.0</jcip.version>
<maven.deploy.skip>false</maven.deploy.skip>
<cobertura-maven-plugin.version>2.7</cobertura-maven-plugin.version>
<mockito.version>2.21.0</mockito.version>
<powermock.version>2.0.2</powermock.version>
<servlet-api.version>2.5</servlet-api.version>
<swagger.version>1.9.3</swagger.version>
<springfox.version>2.9.2</springfox.version>
<swagger-models.version>1.5.24</swagger-models.version>
<guava-retry.version>2.0.0</guava-retry.version>
<protostuff.version>1.7.2</protostuff.version>
<reflections.version>0.9.12</reflections.version>
<byte-buddy.version>1.9.16</byte-buddy.version>
<java-websocket.version>1.5.1</java-websocket.version>
<py4j.version>0.10.9</py4j.version>
<auto-service.version>1.0.1</auto-service.version>
<jacoco.skip>false</jacoco.skip>
<netty.version>4.1.53.Final</netty.version>
<maven-jar-plugin.version>3.2.0</maven-jar-plugin.version>以dolphin-server为server机,以下需要在每台机器创建用户
2. 创建应用用户及免密
# 创建用户需使用root登录,设置部署用户名,请自行修改,后面以dolphinscheduler为例
useradd dolphin;# 设置用户密码,请自行修改,后面以dolphinscheduler123为例
echo &#34;dolphin&#34; | passwd --stdin dolphin# 配置sudo免密
echo &#39;dolphin ALL=(ALL) NOPASSWD: NOPASSWD: ALL&#39; >> /etc/sudoers在84机器上执行
#add ip hostname
vi /etc/hosts
198.28.1.82 ht-28-tdh82
198.28.1.83 ht-28-tdh83
198.28.1.84 ht-28-tdh84#同步dolphin-server上的/etc/hosts到所有部署机器
for ip in dolphin-82 dolphin-83;
do
sudo scp -r /etc/hosts $ip:/etc/ #在运行中需要输入root密码
done#在dolphin-84上,切换到部署用户并配置ssh本机免密登录
su - dolphin;
ssh-keygen -t rsa -P &#39;&#39; -f ~/.ssh/id_rsa
cat ~/.ssh/id_rsa.pub >> ~/.ssh/authorized_keys
chmod 600 ~/.ssh/authorized_keys
for ip in ht-28-tdh82 ht-28-tdh83; #请将此处ds2 ds3替换为自己要部署的机器的hostname
do
ssh-copy-id $ip #该操作执行过程中需要手动输入dolphinscheduler用户的密码
done3. Mysql部署
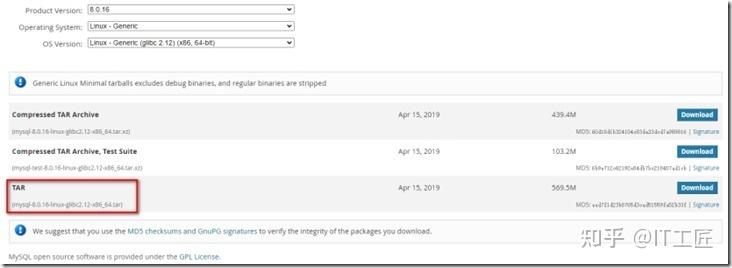
下载mysql 版本 (mysql-8.0.16-linux-glibc2.12-x86_64.tar)
cd /opt/dolphin
tar -xvf mysql-8.0.16-linux-glibc2.12-x86_64.tar
tar -xvJf mysql-8.0.16-linux-glibc2.12-x86_64.tar.xz# 建立软链接,便于以后版本升级
ln -s mysql-8.0.16-linux-glibc2.12-x86_64 mysql创建临时目录、数据目录和日志目录
mkdir -p /opt/dolphin/mysql/3306/data
mkdir -p /opt/dolphin/mysql/3306/log
mkdir -p /opt/dolphin/mysql/3306/tmp# 创建配置文件-root下
cd /etc
# 在my.cnf文件中添加对应的配置项
cp my.cnf my.cnf.bak20220125
vi my.cnf
[client] # 客户端设置,即客户端默认的连接参数
port = 3306 # 默认连接端口
socket = /opt/dolphin/mysql/3306/tmp/mysql.sock # 用于本地连接的socket套接字,mysqld守护进程生成了这个文件
[mysqld] # 服务端基本设置
# 基础设置
server-id = 1 # Mysql服务的唯一编号 每个mysql服务Id需唯一
port = 3306 # MySQL监听端口
basedir = /opt/dolphin/mysql # MySQL安装根目录
datadir = /opt/dolphin/mysql/3306/data # MySQL数据文件所在位置
tmpdir = /opt/dolphin/mysql/3306/tmp # 临时目录,比如load data infile会用到
socket = /opt/dolphin/mysql/3306/tmp/mysql.sock # 为MySQL客户端程序和服务器之间的本地通讯指定一个套接字文件
pid-file = /opt/dolphin/mysql/3306/log/mysql.pid # pid文件所在目录
#skip_name_resolve = 1 # 只能用IP地址检查客户端的登录,不用主机名
character-set-server = utf8mb4 # 数据库默认字符集,主流字符集支持一些特殊表情符号(特殊表情符占用4个字节)
transaction_isolation = READ-COMMITTED # 事务隔离级别,默认为可重复读,MySQL默认可重复读级别
collation-server = utf8mb4_general_ci # 数据库字符集对应一些排序等规则,注意要和character-set-server对应
init_connect=&#39;SET NAMES utf8mb4&#39; # 设置client连接mysql时的字符集,防止乱码
lower_case_table_names = 1 # 是否对sql语句大小写敏感,1表示不敏感
max_connections = 400 # 最大连接数
max_connect_errors = 1000 # 最大错误连接数
explicit_defaults_for_timestamp = true # TIMESTAMP如果没有显示声明NOT NULL,允许NULL值
max_allowed_packet = 128M # SQL数据包发送的大小,如果有BLOB对象建议修改成1G
interactive_timeout = 1800 # MySQL连接闲置超过一定时间后(单位:秒)将会被强行关闭
wait_timeout = 1800 # MySQL默认的wait_timeout值为8个小时, interactive_timeout参数需要同时配置才能生效
tmp_table_size = 16M # 内部内存临时表的最大值 ,设置成128M;比如大数据量的group by ,order by时可能用到临时表;超过了这个值将写入磁盘,系统IO压力增大# 进入MySQL的bin目录安装MySQL数据库
cd /opt/dolphin/mysql/bin# 初始化数据库,并指定启动mysql的用户
./mysqld --initialize --user=dolphin生成随机密码
root@localhost: ,8v_<fe;,.cP设置开机自启动服务
# 复制启动脚本到资源目录
cp /opt/dolphin/mysql/support-files/mysql.server /etc/rc.d/init.d/mysqld# 增加mysqld服务控制脚本执行权限
chmod +x /etc/rc.d/init.d/mysqld# 将mysqld服务加入到系统服务
chkconfig --add mysqld# 检查mysqld服务是否已经生效
chkconfig --list mysqld# 切换至mysql用户,启动mysql
su - dolphin
service mysqld start

配置环境变量
# 修改配置文件,增加
cp .bash_profile .bash_profile_bak20220125
vi .bash_profile
export PATH=$PATH:/opt/dolphin/mysql/bin
# 立即生效
source .bash_profile登陆,修改密码
# 登陆mysql
./mysql -uroot -p -S/opt/dolphin/mysql/3306/tmp/mysql.sock
报错:ERROR 2059 (HY000): Authentication plugin &#39;caching_sha2_password&#39; cannot be loaded: /usr/lib64/mysql/plugin/caching_sha2_password.so: cannot open shared object file: No such file or directory
修改
vi /etc/my.cnf
[mysqld]
default_authentication_plugin=mysql_native_password
重启mysql
service mysqld restart
# 修改root用户密码
alter user &#39;root&#39;@&#39;localhost&#39;IDENTIFIED BY &#39;123456&#39;;4. 数据库初始化
· 进入数据库,默认数据库是PostgreSQL,如选择Mysql的话,后续需要添加mysql-connector-java驱动包到DolphinScheduler的lib目录下,这里以mysql为例
mysql -uroot -p
· 进入数据库命令行窗口后,执行数据库初始化命令,设置访问账号和密码。
mysql> CREATE DATABASE dolphinscheduler DEFAULT CHARACTER SET utf8 DEFAULT COLLATE utf8_general_ci;
Query OK, 1 row affected (0.00 sec)
mysql> create user &#39;dolphin&#39;@&#39;localhost&#39; identified by &#39;dolphin&#39;;
mysql> GRANT ALL PRIVILEGES ON dolphinscheduler.* TO &#39;dolphin&#39;@&#39;localhost&#39;;
Query OK, 0 rows affected, 1 warning (0.00 sec)
mysql> flush privileges;
Query OK, 0 rows affected (0.00 sec)5. Ds部署
root下面创建目录
mkdir -p /opt/dolphin;赋权
chown -R dolphin:dolphin /opt/dolphin
cd /opt/dolphin;
tar -zxvf apache-dolphinscheduler-2.0.2-bin.tar.gz -C /opt/dolphin;#在ds1上,修改目录权限,使得部署用户对dolphin-backend目录有操作权限
chown -R dolphin:dolphin apache-dolphinscheduler-2.0.2-bin· 修改 conf 目录下 application-mysql.yaml 中的下列配置
vi conf/application-mysql.yaml
spring:
datasource:
driver-class-name: com.mysql.jdbc.Driver
url: jdbc:mysql://198.28.1.84:3306/dolphinscheduler?useUnicode=true&characterEncoding=UTF-8
username: dolphin
password: dolphin
hikari:
connection-test-query: select 1
minimum-idle: 5
auto-commit: true
validation-timeout: 3000
pool-name: DolphinScheduler
maximum-pool-size: 50
connection-timeout: 30000
idle-timeout: 600000
leak-detection-threshold: 0
initialization-fail-timeout: 1还需要手动添加 [ mysql-connector-java 驱动 jar ] 包到 lib 目录下,这里下载的是mysql-connector-java-8.0.16.jar
· 修改并保存完后,执行 script 目录下的创建表及导入基础数据脚本
sh script/create-dolphinscheduler.sh发现报错,报出来数据库不对为h2,原因是因为初始化数据脚本是按照
/opt/dolphin/apache-dolphinscheduler-2.0.2-bin/conf/config/install_config.conf去读取配置
可以看下create-dolphinscheduler.sh文件
里面加载了install_config.conf这个文件
#
# Licensed to the Apache Software Foundation (ASF) under one or more
# contributor license agreements. See the NOTICE file distributed with
# this work for additional information regarding copyright ownership.
# The ASF licenses this file to You under the Apache License, Version 2.0
# (the &#34;License&#34;); you may not use this file except in compliance with
# the License. You may obtain a copy of the License at
#
# http://www.apache.org/licenses/LICENSE-2.0
#
# Unless required by applicable law or agreed to in writing, software
# distributed under the License is distributed on an &#34;AS IS&#34; BASIS,
# WITHOUT WARRANTIES OR CONDITIONS OF ANY KIND, either express or implied.
# See the License for the specific language governing permissions and
# limitations under the License.
#
# ---------------------------------------------------------
# INSTALL MACHINE
# ---------------------------------------------------------
# A comma separated list of machine hostname or IP would be installed DolphinScheduler,
# including master, worker, api, alert. If you want to deploy in pseudo-distributed
# mode, just write a pseudo-distributed hostname
# Example for hostnames: ips=&#34;ds1,ds2,ds3,ds4,ds5&#34;, Example for IPs: ips=&#34;192.168.8.1,192.168.8.2,192.168.8.3,192.168.8.4,192.168.8.5&#34;
ips=&#34;ht-28-tdh82,ht-28-tdh83&#34;
# Port of SSH protocol, default value is 22. For now we only support same port in all `ips` machine
# modify it if you use different ssh port
sshPort=&#34;22&#34;
# A comma separated list of machine hostname or IP would be installed Master server, it
# must be a subset of configuration `ips`.
# Example for hostnames: masters=&#34;ds1,ds2&#34;, Example for IPs: masters=&#34;192.168.8.1,192.168.8.2&#34;
masters=&#34;ht-28-tdh84&#34;
# A comma separated list of machine <hostname>:<workerGroup> or <IP>:<workerGroup>.All hostname or IP must be a
# subset of configuration `ips`, And workerGroup have default value as `default`, but we recommend you declare behind the hosts
# Example for hostnames: workers=&#34;ds1:default,ds2:default,ds3:default&#34;, Example for IPs: workers=&#34;192.168.8.1:default,192.168.8.2:default,192.168.8.3:default&#34;
workers=&#34;ht-28-tdh82:default,ht-28-tdh83:default&#34;
# A comma separated list of machine hostname or IP would be installed Alert server, it
# must be a subset of configuration `ips`.
# Example for hostname: alertServer=&#34;ds3&#34;, Example for IP: alertServer=&#34;192.168.8.3&#34;
alertServer=&#34;ht-28-tdh84&#34;
# A comma separated list of machine hostname or IP would be installed API server, it
# must be a subset of configuration `ips`.
# Example for hostname: apiServers=&#34;ds1&#34;, Example for IP: apiServers=&#34;192.168.8.1&#34;
apiServers=&#34;ht-28-tdh84&#34;
# A comma separated list of machine hostname or IP would be installed Python gateway server, it
# must be a subset of configuration `ips`.
# Example for hostname: pythonGatewayServers=&#34;ds1&#34;, Example for IP: pythonGatewayServers=&#34;192.168.8.1&#34;
pythonGatewayServers=&#34;ht-28-tdh84&#34;
# The directory to install DolphinScheduler for all machine we config above. It will automatically be created by `install.sh` script if not exists.
# Do not set this configuration same as the current path (pwd)
installPath=&#34;/opt/dolphin/apache-dolphinscheduler-2.0.2-bin&#34;
# The user to deploy DolphinScheduler for all machine we config above. For now user must create by yourself before running `install.sh`
# script. The user needs to have sudo privileges and permissions to operate hdfs. If hdfs is enabled than the root directory needs
# to be created by this user
deployUser=&#34;dolphin&#34;
# The directory to store local data for all machine we config above. Make sure user `deployUser` have permissions to read and write this directory.
dataBasedirPath=&#34;/opt/dolphin/apache-dolphinscheduler-2.0.2-bin/tmp&#34;
# ---------------------------------------------------------
# DolphinScheduler ENV
# ---------------------------------------------------------
# JAVA_HOME, we recommend use same JAVA_HOME in all machine you going to install DolphinScheduler
# and this configuration only support one parameter so far.
javaHome=&#34;/usr/java/jdk1.8.0_144&#34;
# DolphinScheduler API service port, also this is your DolphinScheduler UI component&#39;s URL port, default value is 12345
apiServerPort=&#34;12345&#34;
# ---------------------------------------------------------
# Database
# NOTICE: If database value has special characters, such as `.*[]^${}\+?|()@#&`, Please add prefix `\` for escaping.
# ---------------------------------------------------------
# The type for the metadata database
# Supported values: ``postgresql``, ``mysql`, `h2``.
DATABASE_TYPE=${DATABASE_TYPE:-&#34;mysql&#34;}
# Spring datasource url, following <HOST>:<PORT>/<database>?<parameter> format, If you using mysql, you could use jdbc
# string jdbc:mysql://127.0.0.1:3306/dolphinscheduler?useUnicode=true&characterEncoding=UTF-8 as example
SPRING_DATASOURCE_URL=${SPRING_DATASOURCE_URL:-&#34;jdbc:mysql://localhost:3306/dolphinscheduler?useUnicode=true&characterEncoding=UTF-8&#34;}
# Spring datasource username
SPRING_DATASOURCE_USERNAME=${SPRING_DATASOURCE_USERNAME:-&#34;dolphin&#34;}
# Spring datasource password
SPRING_DATASOURCE_PASSWORD=${SPRING_DATASOURCE_PASSWORD:-&#34;dolphin&#34;}
# ---------------------------------------------------------
# Registry Server
# ---------------------------------------------------------
# Registry Server plugin name, should be a substring of `registryPluginDir`, DolphinScheduler use this for verifying configuration consistency
registryPluginName=&#34;zookeeper&#34;
# Registry Server address.
registryServers=&#34;198.28.1.81:2181,198.28.1.82:2181,198.28.1.83:2181&#34;
# The root of zookeeper, for now DolphinScheduler default registry server is zookeeper.
zkRoot=&#34;/dolphinscheduler&#34;
# ---------------------------------------------------------
# Worker Task Server
# ---------------------------------------------------------
# Worker Task Server plugin dir. DolphinScheduler will find and load the worker task plugin jar package from this dir.
taskPluginDir=&#34;lib/plugin/task&#34;
# resource storage type: HDFS, S3, NONE
resourceStorageType=&#34;NONE&#34;
# resource store on HDFS/S3 path, resource file will store to this hdfs path, self configuration, please make sure the directory exists on hdfs and has read write permissions.
&#34;/dolphinscheduler&#34; is recommended
resourceUploadPath=&#34;/dolphinscheduler&#34;
# if resourceStorageType is HDFS,defaultFS write namenode address,HA, you need to put core-site.xml and hdfs-site.xml in the conf directory.
# if S3,write S3 address,HA,for example :s3a://dolphinscheduler,
# Note,S3 be sure to create the root directory /dolphinscheduler
defaultFS=&#34;hdfs://198.28.1.81:8020&#34;
# if resourceStorageType is S3, the following three configuration is required, otherwise please ignore
s3Endpoint=&#34;http://192.168.xx.xx:9010&#34;
s3AccessKey=&#34;xxxxxxxxxx&#34;
s3SecretKey=&#34;xxxxxxxxxx&#34;
# resourcemanager port, the default value is 8088 if not specified
resourceManagerHttpAddressPort=&#34;8088&#34;
# if resourcemanager HA is enabled, please set the HA IPs; if resourcemanager is single node, keep this value empty
yarnHaIps=&#34;192.168.xx.xx,192.168.xx.xx&#34;
# if resourcemanager HA is enabled or not use resourcemanager, please keep the default value; If resourcemanager is single node, you only need to replace &#39;yarnIp1&#39; to actual re
sourcemanager hostname
singleYarnIp=&#34;yarnIp1&#34;
# who has permission to create directory under HDFS/S3 root path
# Note: if kerberos is enabled, please config hdfsRootUser=
hdfsRootUser=&#34;hdfs&#34;
# kerberos config
# whether kerberos starts, if kerberos starts, following four items need to config, otherwise please ignore
kerberosStartUp=&#34;false&#34;
# kdc krb5 config file path
krb5ConfPath=&#34;$installPath/conf/krb5.conf&#34;
# keytab username,watch out the @ sign should followd by \\
keytabUserName=&#34;hdfs&#34;
# username keytab path
keytabPath=&#34;$installPath/conf/hdfs.keytab&#34;
# kerberos expire time, the unit is hour
kerberosExpireTime=&#34;2&#34;
# use sudo or not
sudoEnable=&#34;true&#34;
# worker tenant auto create
workerTenantAutoCreate=&#34;false&#34;环境变量env/dolphinscheduler_env.sh
#
# Licensed to the Apache Software Foundation (ASF) under one or more
# contributor license agreements. See the NOTICE file distributed with
# this work for additional information regarding copyright ownership.
# The ASF licenses this file to You under the Apache License, Version 2.0
# (the &#34;License&#34;); you may not use this file except in compliance with
# the License. You may obtain a copy of the License at
#
# http://www.apache.org/licenses/LICENSE-2.0
#
# Unless required by applicable law or agreed to in writing, software
# distributed under the License is distributed on an &#34;AS IS&#34; BASIS,
# WITHOUT WARRANTIES OR CONDITIONS OF ANY KIND, either express or implied.
# See the License for the specific language governing permissions and
# limitations under the License.
#
export HADOOP_HOME=/opt/soft/hadoop
export HADOOP_CONF_DIR=/opt/soft/hadoop/etc/hadoop
export SPARK_HOME1=/opt/soft/spark1
export SPARK_HOME2=/opt/soft/spark2
export PYTHON_HOME=/opt/soft/python
export JAVA_HOME=/usr/java/jdk1.8.0_144
export HIVE_HOME=/opt/soft/hive
export FLINK_HOME=/opt/soft/flink
export DATAX_HOME=/opt/soft/datax
export PATH=$HADOOP_HOME/bin:$SPARK_HOME1/bin:$SPARK_HOME2/bin:$PYTHON_HOME/bin:$JAVA_HOME/bin:$HIVE_HOME/bin:$FLINK_HOME/bin:$DATAX_HOME/bin:$PATHsh install.sh执行根目录install.sh安装部署
会出现启动成功的状态
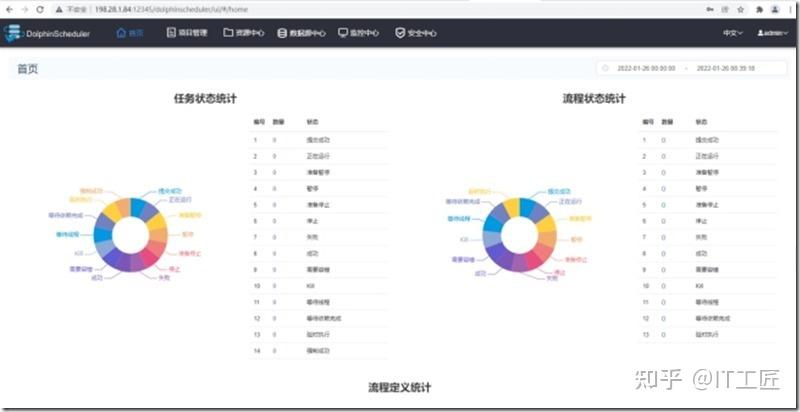
访问页面
http://198.28.1.84:12345/dolphinscheduler
下次说下功能使用吧,谢谢
问题解决:
1.mysql开启外网访问,参考https://www.cnblogs.com/ningy1009/p/12806748.html |
|


 发表于 2023-1-12 07:39:45